Articles by "software_programming"
Showing posts with label software_programming. Show all posts
A unique platform to get tutorials on basic and advance computer skills like programming, blogging. Get latest technology updates,news, tutorials
 Xamarin Tutorials
In this example we will examine how to multiple activities communicate each other.
Android application is composed of multiple activities and they often communicate with each other by passing data. For example, lets say your application contains two activity Activity1 and Activity2. Activity1 is marked as launcher activity, which means it will be invoked automatically when user taps on the application icon from applications list. Note that, there can be at most one launcher activity throughout application. When user clicks on a button in Activity1, it will invoke Activity2.

Starting activity in Xamarin.Android

Xamarin Android provides easy to use startActivity method in activity context. The following code snippet will start Activity2 without passing any data
 StartActivity(typeof(Activity2));

Starting activity by passing arguments

The above code block starts Activity2 without passing any data. However Xamarin android allows you to pass data from one activity to another using Intent bundle. All you have to do is to pass the instance of Intent to startActivity() method.
The Intent describes the activity to start and carries the data bundle to be sent to target activity. Intent can carry data types as key-value pairs called extras. The putExtra()method takes the key name in the first parameter and the value in the second parameter. Passing data between activities is limited to primitive data types. For object type you must use Parceable or Serilizable. For more information on the data types and intent, you can refer to official android documentation from below links.
http://developer.android.com/reference/android/content/Intent.html
http://developer.android.com/reference/android/os/Bundle.html
Intent intent = new Intent(this, typeof(MainActivity2));
intent.PutExtra("name", "Nilanchala");
intent.PutExtra("empid", 1001);
StartActivity(intent);
Retrieving data bundles received
We can receive the above passed data in “Activity2” using the below code snippet
string name = Intent.GetStringExtra("name");
int roll = Intent.GetIntegerExtra("empid");
Note that you must use the same keys such as “name” and “empid” while retrieving the values from Activity2.

Receiving result back from Activity

If you want to receive a result from the activity when it finishes, callstartActivityForResult() instead of startActivity(). Your activity receives the result as a separate Intent object in your activity’s onActivityResult() callback.
Source: javatechig
A unique platform to get tutorials on basic and advance computer skills like programming, blogging. Get latest technology updates,news, tutorials

Previous Chapter

 http://itechplatform.blogspot.com.ng/

Telling the Computer What to Do

A computer program, also called software, is a way to tell a computer what to do. Everything that the computer does, from booting up to shutting down, is done by a program. Windows XP is a program. Ms. Pac-Man is a program. The dir command used in MS-DOS to display file names is also a program. Even the Klez email worm is a program.
Computer programs are made up of a list of commands the computer handles in a specific order when the program is run. Each of these commands is called a statement.
If you're a science fiction fan, you're probably familiar with the concept of household robots. If not, you might be familiar with the concept of henpecked spouses. In either case, someone gives very specific instructions telling the robot or spouse what to do, something like the following:
  • Dear Theobald,
  • Please take care of these errands for me while I'm out lobbying members of Congress:
  • Item 1: Vacuum the living room.
  • Item 2: Go to the store.
  • Item 3: Pick up butter, lozenges, and as many bottles of Heinz E-Z Squirt green ketchup as you can carry.
  • Item 4: Return home.
  • Love,
  • Snookie Lumps
If you tell a loved one or artificially intelligent robot what to do, there's a certain amount of leeway in how your requests are fulfilled. If lozenges aren't available, cough medicine might be brought to you instead. Also, the trip to the store can be accomplished through a variety of routes. Computers don't do leeway. They follow instructions literally. The programs that you write will be followed precisely, one statement at a time.
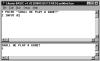
The following is one of the simplest examples of a computer program, written in BASIC. Take a look at it, but don't worry yet about what each line is supposed to mean.
1 PRINT "Shall we play a game?" 
2 INPUT A$ 
Translated into English, this program is equivalent to giving a computer the following to-do list:
  • Dear personal computer,
  • Item 1: Display the question, "Shall we play a game?"
  • Item 2: Give the user a chance to answer the question.
  • Love,
  • Snookie Lumps
Each of the lines in the computer program is a statement. A computer handles each statement in a program in a specific order, in the same way that a cook follows a recipe, or Theobald the robot followed the orders of Snookie Lumps when he vacuumed and shopped at the market. In BASIC, the line numbers are used to put the statements in the correct order. Other languages, such as Java, do not use line numbers, favoring different ways to tell the computer how to run a program.
Figure 1.1 shows the sample BASIC program running on the Liberty BASIC interpreter, a shareware program that can be used to develop Windows and OS/2 programs. Liberty BASIC, which was developed by Carl Gundel, is among many BASIC interpreters that can be found on the Internet for Microsoft Windows, Apple Macintosh, Unix, and Linux systems. You can find out more about it at http://www.libertybasic.com.
01fig01.gif Figure 1.1 An example of a BASIC program running in Liberty BASIC.
Because of the way programs operate, it's hard to blame the computer when something goes wrong while your program runs. After all, the computer was just doing exactly what you told it to do. Unless your hardware is on the fritz, a pesky virus is attacking your system, or your operating system is having a bad day, the blame for program errors lies with the programmer. That's the bad news. The good news is that you can't do any permanent harm to your computer with the programming errors you make. No one was harmed during the making of this book, and no computers will be injured as you learn how to program with Java.

Reference: Sams Ebook
Source:informit
A unique platform to get tutorials on basic and advance computer skills like programming, blogging. Get latest technology updates,news, tutorials

 Previous Chapter

Choosing a Language

As you might have surmised at this point, computer programming is not as hard as it's cracked up to be. If you're comfortable enough with a computer to create a nice-looking resume, balance a checkbook with software such as Intuit Quicken, or create your own home page on the Web, you can write programs.
The key to learning how to program is to start with the right language. The programming language you choose often depends on the tasks you want the computer to accomplish. Each language has things it is well-suited for, as well as things that are difficult—perhaps impossible—to do with the language. For example, many people use some form of the BASIC language when they are learning how to program because BASIC was created with beginners in mind.
Microsoft Visual Basic combines the ease of BASIC with some powerful features to aid in the design of Windows software. (VBScript, which is short for Visual Basic Script, offers the simplicity of BASIC for small programs that run in conjunction with World Wide Web pages.) Visual Basic has been used to write thousands of sophisticated programs for commercial, business, and personal use. However, Visual Basic programs can be slower than Windows programs written in other languages, such as Borland C++. This difference is especially noticeable in programs that use a lot of graphics—games, screen savers, and the like.
This book covers the Java programming language, which was developed by Sun Microsystems. Though Java is more difficult to learn than a language such as Visual Basic, it is a good starting place for several reasons. One of the biggest advantages of learning Java is that you can use it on the World Wide Web. If you're an experienced Web surfer, you have seen numerous Java programs in action. They can be used to create animated graphics, present text in new ways, play games, and help in other interactive efforts.
Another important advantage is that Java requires an organized approach for getting programs to work. The language is very particular about the way programs must be written, and it balks if programmers do not follow all of its rules. When you start writing Java programs, you might not see the language's choosy behavior as an advantage. You'll write a program and have several errors to fix before the program is finished. Some of your fixes might not be correct, and they will have to be redone. If you don't structure a program correctly as you are writing it, errors will result. In the coming hours, you'll learn about these rules and the pitfalls to avoid. The positive side of this extra effort is that your programs will be more reliable, useful, and error-free.
Java was invented by Sun Microsystems developer James Gosling as a better way to create computer programs. Gosling was unhappy with the way that the C++ programming language was working on a project he was doing, so he created a new language that did the job better. It's a matter of contentious debate whether Java is superior to other programming languages, of course, but the amount of attention paid to the language today shows that it has a large number of adherents. Book publishers obviously dig it—more than 1,000 books have been published about the language since its introduction. (This is my tenth, and I will keep writing more of them until prohibited by municipal, state, or federal law.)
Regardless of whether Java is the best language, it definitely is a great language to learn today. There are numerous resources for Java programmers on the Web, Java job openings are offered in many cities, and the language has become a major part of the Internet's past, present, and future. You'll get a chance to try out Java during Hour 2, "Writing Your First Program."
Learning Java or any other programming language makes it much easier to learn subsequent languages. Many languages are similar to each other, so you won't be starting from scratch when you dive into a new one. For instance, many C++ programmers find it fairly easy to learn Java, because Java borrows a lot of its structure and ideas from C++. Many programmers are comfortable using several different languages and will learn new ones as needed.
A unique platform to get tutorials on basic and advance computer skills like programming, blogging. Get latest technology updates,news, tutorials


Previous Chapter

Hour 1. Becoming a Programmer

Computer programming is insanely difficult. It requires a four-year degree in computer science, thousands of dollars in computer hardware and software, a keen analytical intellect, the patience of Job, and a strong liking for caffeinated drinks. If you're a programming novice, this is probably what you've heard about computer programming. Aside from the part about caffeine, all of the rumors are greatly exaggerated.
Programming is a lot easier than most people think, although there are several reasons why you might believe otherwise:
  • Computer programmers have been telling people for years that programming is hard. This belief makes it easier for us to find high-paying jobs (or so I've heard), and gives us more leeway to goof off during business hours.
  • Computer programming manuals are often written in a language that only a Scrabble player could appreciate. Strange acronyms like OOP, RAD, COM, and MUMPS are used frequently along with newly invented jargon like instantiation, bytecode, and makefile.
  • Many computer programming languages have been available only with software packages costing $200 or more, which is a lot of cabbage.
Because of the growth of the Internet and other factors, this is a great time to learn programming. Useful programming tools are being made available at low cost (or no cost), often as downloads from World Wide Web sites. Thousands of programmers are distributing their work under "open source" licenses so people can examine how the programs were written, correct errors, and add their own improvements.
The goal of this book is to teach programming to the person who has never tried to program before, or the person who tried programming but hated it with an intense passion. The English language will be used as much as possible instead of jargon and obscure acronyms, and all new programming terms will be thoroughly explained as they are introduced.
If I've succeeded, you will finish Sams Teach Yourself Java 2 in 24 Hours with enough programming skill to be a danger to yourself and others. You'll be able to write programs, dive into other programming books with more confidence, and learn programming languages more easily. You also will have developed skills with Java, the most exciting programming language to be introduced in a decade.
The first hour of this book provides some introductory material about programming and gives you instructions on how to set up your computer so you can write Java programs. The following topics will be covered:
  • Choosing which programming language to learn first
  • What Java is
  • Using programs to boss your computer around
  • How programs work
  • How program errors (called bugs) are fixed
  • Acquiring a Java development tool
  • Getting ready to write programs
A unique platform to get tutorials on basic and advance computer skills like programming, blogging. Get latest technology updates,news, tutorials


Part I: Getting Started

Hour

1 Becoming a Programmer
2 Writing Your First Program
3 Vacationing in Java
4 Understanding How Java Programs Work
A unique platform to get tutorials on basic and advance computer skills like programming, blogging. Get latest technology updates,news, tutorials


Introduction

As the author of computer books, I spend a lot of time loitering in the computer section of bookstores such as Barnes & Noble and Borders, observing the behavior of shoppers browsing through the books as if they were a hominid jawbone and I was a paleontologist.

Because of my research, I've learned that if you have picked up this book and turned to the introduction, I have around 12 more seconds before you put it down and head to the coffee bar for a double tall latte decaf skim with two shots of vanilla hold the whip.

So I'll keep this brief: This Java programming stuff is a lot easier than it looks. I'm not supposed to tell you that, because there are thousands of programmers who have used their Java skills to get high-paying jobs in software development, Internet programming, and e-commerce. The last thing any of them want is for their bosses to know that anyone who has persistence and a little free time can learn this language, the most popular programming language in use today. By working your way through each of the one-hour tutorials in Sams Teach Yourself Java 2 in 24 Hours you'll be able to learn Java programming quickly.

Anyone can learn how to write computer programs—even if they can't program a VCR. Java is one of the best programming languages to learn because it's a useful, powerful, modern technology that's being used by thousands of programmers around the world.

This book is aimed at non-programmers, new programmers who hated learning the subject, and experienced programmers who want to quickly get up to speed with Java. It uses Java 2 version 1.4, the current version of the language.

Java is the Tiger Woods of programming languages because of the things it makes possible. You can create programs that feature a graphical user interface, design software that makes the most of the Internet, connect to databases, add animation and sound to World Wide Web pages, and more.

This book teaches Java programming from the grounds up. It introduces the concepts in English instead of jargon, with plenty of step-by-step examples of working programs you will create. Spend 24 hours with this book and you'll be writing your own Java programs, confident in your ability to use the language and learn more about it. You also will have skills that are becoming increasingly important—such as network computing, graphical user interface design, and object-oriented programming.

These terms might not mean much to you now. In fact, they're probably the kind of things that make programming seem like a secret ritual known only to a small group of humans who have a language of their own. However, if you can use a computer to create an attractive resume, balance your checkbook, or create a home page, you can write computer programs by reading Sams Teach Yourself Java 2 in 24 Hours.

Note:
At this point, if you would rather have coffee than Java, please reshelve this book with the front cover facing outward on an endcap with access to a lot of the store's foot traffic.
A unique platform to get tutorials on basic and advance computer skills like programming, blogging. Get latest technology updates,news, tutorials
Previous Chapter 
www.itechplatform.blogspot.com
The varibles in C#, are categorized into the following types:
  • Value types
  • Reference types
  • Pointer types

Value Type

Value type variables can be assigned a value directly. They are derived from the class System.ValueType.
The value types directly contain data. Some examples are int, char, and float, which stores numbers, alphabets, and floating point numbers, respectively. When you declare an int type, the system allocates memory to store the value.
The following table lists the available value types in C# 2010:
Type Represents Range Default Value
bool Boolean value True or False False
byte 8-bit unsigned integer 0 to 255 0
char 16-bit Unicode character U +0000 to U +ffff '\0'
decimal 128-bit precise decimal values with 28-29 significant digits (-7.9 x 1028 to 7.9 x 1028) / 100 to 28 0.0M
double 64-bit double-precision floating point type (+/-)5.0 x 10-324 to (+/-)1.7 x 10308 0.0D
float 32-bit single-precision floating point type -3.4 x 1038 to + 3.4 x 1038 0.0F
int 32-bit signed integer type -2,147,483,648 to 2,147,483,647 0
long 64-bit signed integer type -9,223,372,036,854,775,808 to 9,223,372,036,854,775,807 0L
sbyte 8-bit signed integer type -128 to 127 0
short 16-bit signed integer type -32,768 to 32,767 0
uint 32-bit unsigned integer type 0 to 4,294,967,295 0
ulong 64-bit unsigned integer type 0 to 18,446,744,073,709,551,615 0
ushort 16-bit unsigned integer type 0 to 65,535 0
To get the exact size of a type or a variable on a particular platform, you can use the sizeof method. The expression sizeof(type) yields the storage size of the object or type in bytes. Following is an example to get the size of int type on any machine:
using System;
namespace DataTypeApplication
{
   class Program 
   {
      static void Main(string[] args)
      {
         Console.WriteLine("Size of int: {0}", sizeof(int));
         Console.ReadLine();
      }
   }
}
When the above code is compiled and executed, it produces the following result:
Size of int: 4

Reference Type

The reference types do not contain the actual data stored in a variable, but they contain a reference to the variables.
In other words, they refer to a memory location. Using multiple variables, the reference types can refer to a memory location. If the data in the memory location is changed by one of the variables, the other variable automatically reflects this change in value. Example of built-in reference types are: object, dynamic, and string.

Object Type

The Object Type is the ultimate base class for all data types in C# Common Type System (CTS). Object is an alias for System.Object class. The object types can be assigned values of any other types, value types, reference types, predefined or user-defined types. However, before assigning values, it needs type conversion.
When a value type is converted to object type, it is called boxing and on the other hand, when an object type is converted to a value type, it is called unboxing.
object obj;
obj = 100; // this is boxing

Dynamic Type

You can store any type of value in the dynamic data type variable. Type checking for these types of variables takes place at run-time.
Syntax for declaring a dynamic type is:
dynamic  = value;
For example,
dynamic d = 20;
Dynamic types are similar to object types except that type checking for object type variables takes place at compile time, whereas that for the dynamic type variables takes place at run time.

String Type

The String Type allows you to assign any string values to a variable. The string type is an alias for the System.String class. It is derived from object type. The value for a string type can be assigned using string literals in two forms: quoted and @quoted.
For example,
String str = "Tutorials Point";
A @quoted string literal looks as follows:
@"Tutorials Point";
The user-defined reference types are: class, interface, or delegate. We will discuss these types in later chapter.

Pointer Type

Pointer type variables store the memory address of another type. Pointers in C# have the same capabilities as the pointers in C or C++.
Syntax for declaring a pointer type is:
type* identifier;
For example,
char* cptr;
int* iptr;
We will discuss pointer types in the chapter 'Unsafe Codes'.

Reference: Tutorialspoint
A unique platform to get tutorials on basic and advance computer skills like programming, blogging. Get latest technology updates,news, tutorials
Continuation from the previous chapter(C# program Structure)
 www.itechplatform.blogspot.com
C# is an object-oriented programming language. In Object-Oriented Programming methodology, a program consists of various objects that interact with each other by means of actions. The actions that an object may take are called methods. Objects of the same kind are said to have the same type or, are said to be in the same class.

For example, let us consider a Rectangle object. It has attributes such as length and width. Depending upon the design, it may need ways for accepting the values of these attributes, calculating the area, and displaying details.

Let us look at implementation of a Rectangle class and discuss C# basic syntax:

using System;
namespace RectangleApplication
{
   class Rectangle 
   {
      // member variables
      double length;
      double width;
      public void Acceptdetails()
      {
         length = 4.5;    
         width = 3.5;
      }
      
      public double GetArea()
      {
         return length * width; 
      }
      
      public void Display()
      {
         Console.WriteLine("Length: {0}", length);
         Console.WriteLine("Width: {0}", width);
         Console.WriteLine("Area: {0}", GetArea());
      }
   }
   
   class ExecuteRectangle 
   {
      static void Main(string[] args) 
      {
         Rectangle r = new Rectangle();
         r.Acceptdetails();
         r.Display();
         Console.ReadLine(); 
      }
   }
}

The using Keyword

The first statement in any C# program is
using System;
The using keyword is used for including the namespaces in the program. A program can include multiple using statements.

The class Keyword

The class keyword is used for declaring a class.

Comments in C#

Comments are used for explaining code. Compilers ignore the comment entries. The multiline comments in C# programs start with /* and terminates with the characters */ as shown below:

/* This program demonstrates
The basic syntax of C# programming 
Language */
 
Single-line comments are indicated by the '//' symbol. For example,
}//end class Rectangle    

Member Variables

Variables are attributes or data members of a class, used for storing data. In the preceding program, the Rectangle class has two member variables named length and width.

Member Functions

Functions are set of statements that perform a specific task. The member functions of a class are declared within the class. Our sample class Rectangle contains three member functions: AcceptDetails, GetArea and Display.

Instantiating a Class

In the preceding program, the class ExecuteRectangle contains the Main() method and instantiates the Rectangle class.

Identifiers

An identifier is a name used to identify a class, variable, function, or any other user-defined item. The basic rules for naming classes in C# are as follows:
  • A name must begin with a letter that could be followed by a sequence of letters, digits (0 - 9) or underscore. The first character in an identifier cannot be a digit.
  • It must not contain any embedded space or symbol such as? - + ! @ # % ^ & * ( ) [ ] { } . ; : " ' / and \. However, an underscore ( _ ) can be used.
  • It should not be a C# keyword.

C# Keywords

Keywords are reserved words predefined to the C# compiler. These keywords cannot be used as identifiers. However, if you want to use these keywords as identifiers, you may prefix the keyword with the @ character.
In C#, some identifiers have special meaning in context of code, such as get and set are called contextual keywords.
The following table lists the reserved keywords and contextual keywords in C#:
Reserved Keywords
abstract as base bool break byte case
catch char checked class const continue decimal
default delegate do double else enum event
explicit extern false finally fixed float for
foreach goto if implicit in in (generic modifier) int
interface internal is lock long namespace new
null object operator out out (generic modifier) override params
private protected public readonly ref return sbyte
sealed short sizeof stackalloc static string struct
switch this throw true try typeof uint
ulong unchecked unsafe ushort using virtual void
volatile while


Contextual Keywords
add alias ascending descending dynamic from get
global group into join let orderby partial (type)
partial
(method)
remove select set

Reference:tutorialspoint
A unique platform to get tutorials on basic and advance computer skills like programming, blogging. Get latest technology updates,news, tutorials
 Image result for c# programming logo
Before we study basic building blocks of the C# programming language, let us look at a bare minimum C# program structure so that we can take it as a reference in upcoming chapters.

Creating Hello World Program

A C# program consists of the following parts:
  • Namespace declaration
  • A class
  • Class methods
  • Class attributes
  • A Main method
  • Statements and Expressions
  • Comments
Let us look at a simple code that prints the words "Hello World":

using System;
namespace HelloWorldApplication
{
   class HelloWorld
   {
      static void Main(string[] args)
      {
         /* my first program in C# */
         Console.WriteLine("Hello World");
         Console.ReadKey();
      }
   }
}

When this code is compiled and executed, it produces the following result:

>>Hello World

Let us look at the various parts of the given program:

  • The first line of the program using System; - the using keyword is used to include the System namespace in the program. A program generally has multiple using statements
  • The next line has the namespace declaration. A namespace is a collection of classes. The HelloWorldApplication namespace contains the class HelloWorld.
  • The next line has a class declaration, the class HelloWorld contains the data and method definitions that your program uses. Classes generally contain multiple methods. Methods define the behavior of the class. However, the HelloWorld class has only one method Main.
  • The next line defines the Main method, which is the entry point for all C# programs. The Main method states what the class does when executed.
  • The next line /*...*/ is ignored by the compiler and it is put to add comments in the program.
  • The Main method specifies its behavior with the statement Console.WriteLine("Hello World");
  • WriteLine is a method of the Console class defined in the System namespace. This statement causes the message "Hello, World!" to be displayed on the screen.
  • The last line Console.ReadKey(); is for the VS.NET Users. This makes the program wait for a key press and it prevents the screen from running and closing quickly when the program is launched from Visual Studio .NET.

It is worth to note the following points:

C# is case sensitive.

All statements and expression must end with a semicolon (;).

The program execution starts at the Main method.

Unlike Java, program file name could be different from the class name.

Compiling and Executing the Program
If you are using Visual Studio.Net for compiling and executing C# programs, take the following steps:

Start Visual Studio.

On the menu bar, choose File -> New -> Project.

Choose Visual C# from templates, and then choose Windows.

Choose Console Application.

Specify a name for your project and click OK button.

This creates a new project in Solution Explorer.

Write code in the Code Editor.

Click the Run button or press F5 key to execute the project. A Command Prompt window appears that contains the line Hello World.

You can compile a C# program by using the command-line instead of the Visual Studio IDE:

Open a text editor and add the above-mentioned code.

Save the file as helloworld.cs

Open the command prompt tool and go to the directory where you saved the file.

Type csc helloworld.cs and press enter to compile your code.

If there are no errors in your code, the command prompt takes you to the next line and generates helloworld.exe executable file.

Type helloworld to execute your program.

You can see the output Hello World printed on the screen.

reference: tutorialspoint
A unique platform to get tutorials on basic and advance computer skills like programming, blogging. Get latest technology updates,news, tutorials
 ios progrmming
In the previous post in this series, we talked about using the Windows Bridge for iOS to create Universal Windows Platform (UWP) apps that can run on Windows 10 devices using existing Objective-C code. This post focuses on getting Xcode and iOS developers familiar with the Visual Studio IDE, whether starting from scratch or using existing code from a source repository, such as GitHub.
Modern IDEs, especially those for app development, are becoming very similar. While each may have its own nuances and intricate IDE features, they will all generally offer the same key functionalities. There will be a way to load projects and solutions, lay out controls visually, work with code, and debug with some level of emulation. As a result, once you learn the basics of one IDE, you’ll find you can pretty easily transfer that knowledge to the others.
It is no different moving between Xcode and Visual Studio. In fact, the team at the One Dev Minute blog on Channel 9 put together an excellent summary video that quickly shows a feature-for-feature comparison when putting together a sample app, though it shows older versions of Visual Studio and Xcode.
The first step in working with any IDE is loading up a project. In Visual Studio (click here to get the free Visual Studio 2015 Community edition), the steps are basically the same as starting a project in Xcode. Just point to File →New → Project.
In this case, we’ll pick a project template from a list of installed templates, set the application and solution name, and select the directory where the files will be stored:
2_directory
After clicking OK, the template creates a runnable UWP app that compiles and runs but contains no UI or data. We selected the Blank App template above. As with all templates, this will create the minimal required files needed for creating an app:
  • Packages, libraries, frameworks, and references needed for the app to run
  • A manifest file (appxmanifest) that describes your app (its title, description, start page, et cetera) and lists all the files that your app contains
  • Code files for your app
  • Set of logo images to display in the start menu
  • Windows Store app image
  • A temporary key file (.pfx) for signing and deploying your app during development
  • Splash screen
  • XAML (xaml) page to get you started coding your UI
3_template
Note: If this is the first UWP app you’ve created with Visual Studio, you will need to set your device to “Developer Mode” in order to run and build applications. In fact, you’ll get the prompt whether or not your device is in developer mode.
With the project loaded into Visual Studio, let’s explore some of the main windows in the IDE.
Note: The following assumes you’re using the default window layout in Visual Studio. If you change the default layout, you can reset it in the Window menu by using the Reset Window Layout command (in the toolbar, click Window → Reset Window Layout.
The first thing you will notice is the code window. This window is where you will work directly with the code files used in your application. The code window is tabbed. Every file you open starts a new tab. If you have too many tabs open to be displayed across the top of the window, you can use the drop down arrow on the right to navigate between files.
reference: visualstudio
A unique platform to get tutorials on basic and advance computer skills like programming, blogging. Get latest technology updates,news, tutorials
What we're going to do first is to create a very simple programme, so that you can see what makes up a C# .NET project. By the end of this chapter, you'll have learnt the following:
  • How to create new projects
  • What the Solution Explorer is
  • The various files that make up of a C# .NET project
  • How to save your work
  • How to run programs
  • The importance of the Main statement
The simple program we'll create is called a Console Application. We won't be doing much else with this type of application, as this is a course about Windows Applications. Off we go then!
Open the Visual C# Express software from your programs menu. When you first open C# (pronounced C Sharp), you should see a screen something like this, if you have Visual Studio Express 2012:

When you first start Visual Studio Community 2015 edition, you'll see a screen like this one:
Visual Studio Community Edition 2015
This let's you select the colour scheme for the software. We've gone for Light, in the screenshot above. Click the Start Visual Studio button at the bottom and you'll see this screen appear:

When you're looking at this piece of software for the first time, it can seem hugely complex and daunting. The temptation is to think you're never going to get to grips with something so difficult. But don't worry - after a few lessons things will start to feel familiar, and you won't feel nearly half as intimidated as you do now!

A Simple C# Console Application
A Console Application is one that looks like a DOS window. If you don't know what these are, click your Start menu in the bottom left of your screen. In Vista and Windows 7, type cmd in the search box at the bottom of the start menu. In Windows 8 and 10, the search box is on the Start Screen page. You'll then see the search results appear:

CMD search in Windows 7
Click cmd.exe to see the console appear.
Click OK and you'll see a black screen, like this one:
A DOS Window
This is the type of window you'll see for our Console Application. When you create your Windows forms, there's a whole lot of code to get used to. But Console Applications start off fairly simple, and you can see which part of the programme is the most important.
So with Visual C# Express open, click File from the menu bar at the top. From the File menu, select New Project (or click the New Project link on the left of the opening screen):

New Project menu in C# 2010
When you click on New Project, you'll see the following dialogue box appear:
A New Console Project in C# 2012
Click on Templates from the list on the left. Under Templates, click on Visual C#. You'll then see Console Application appear in the middle. (Community 2015 users will see more items in the middle.)
The New Project dialogue box is where you select the type of project you want to create. If you have a version of Visual Studio Express prior to Community 2015, your options are limited. For the rest of this book, we'll be creating Windows Applications. For now, select Console Application. Then click OK.
When you click OK, a new Console Application project will be created for you. Some code should be displayed:

The Coding Window in Visual C# Express
As well as the code, have a look on the right hand side and you'll see the Solution Explorer. This is where all the files for your project are. (If you can't see the Solution Explorer, click View from the C# menu bar at the top. From the View menu, click Solution Explorer.)
The code itself will look very complicated, if you're new to programming. We'll get to it shortly. For now, right click the Program.cs tab at the top, and click Close from the menu that appears:
Close the Program
Or just click the X in the top right corner:
Close Program
Now double click the Program.cs file in the Solution Explorer:
The Solution Explorer in C# Express
When you double click Program.cs, you should see the code reappear. So this code is the programme that will run when anyone starts your application.
Now click the arrow symbol next to Properties in the Solution Explorer above. You'll see the following:
The Properties option in the Solution Explorer
The file called AssemblyInfo.cs contains information about your programme. Double click this file to open it up and see the code. Here's just some of it:
AssemblyInfo.cs
The reddish colour text is something you can change. You can add a Title, Description, Copyright, Trademark, etc.
But right click the AssemblyInfo.cs tab at the top, and click Close from the menu. Now, in the Solution Explorer, click the plus symbol next to References:
Console Application references
These are references to code built-in to C# (you may see more entries in the Community 2015 edition). Much later, you'll see how to add your own files to this section.
Before we add some code, let's save the project. We'll do that in the next part below.

Reference: Homeandlearn
A unique platform to get tutorials on basic and advance computer skills like programming, blogging. Get latest technology updates,news, tutorials

introduction

Instructions for use


Basics of C++

Structure of a program

Variables. Data types.

Constants

Operators

Basic Input/Output


Control Structures

Control Structures

Functions (I)

Functions (II)

no image
A unique platform to get tutorials on basic and advance computer skills like programming, blogging. Get latest technology updates,news, tutorials

Structure of a program

Probably the best way to start learning a programming language is by writing a program. Therefore, here is our first program: 

1
2
3
4
5
6
7
8
9
10
// my first program in C++

#include <iostream>
using namespace std;

int main ()
{
  cout << "Hello World!";
  return 0;
}
Hello World!